Celebrating Mother's Day with My People

I love nothing more than gathering around a laden table full of delicious food and my favorite people. As a matter of fact, my favorite people happen to be my kids. 

Mother's Day weekend felt like it should have a lot of those moments. But of course, I wanted to spend as much time as possible just visiting with Amy and Adam. And enjoying my delightful grandson. So I opted for a super simple (but delicious!) menu. You know my motto: "Food Should Taste Delicious."

In this case I have a favorite go-to Chicken and Pasta Bake. It takes almost no time to put together (and I cheat a little by getting a pre-cooked chicken to save time) but it has a super wow factor when it hits the table. 

I was truly craving more time to connect with everyone, including my own mom, Luza. She's 101, as you know, and I felt like time together was much more important than creating an elaborate meal.

My-big-fat-cuban-family-4-generations

Also, my kids were all here for the weekend and because I don't get to see the two older ones as much since they've moved, I felt like incredibly blessed and  I was, of course, crazy-happy. My whole everyone-around-the-table-fantasy actually came true. 

Darbys-with-signs2

Celebrating our family being together was paramount. And feeding them mass quantities, I feel, is part of my job description. Keeping it super simple was Eric's only stipulation. (I tend to make myself a little crazy working super hard in the kitchen  but that's not important right now.)

Fine. I can do simple with the best of them. This weekend was a total win. I didn't cook Cuban, although I suppose I could have. But I did go Italian. Read here about my mom and the Random Italian Thing.

I ran over to Walmart and picked up some Barilla® Penne Pasta. I planned on making a simple chicken and pasta bake that's always a favorite around here.

Once it's in the oven, I have much more time to visit and hold the baby. Win.

Chicken and Pasta Bake Recipe

Chicken-and-pasta-bake-recipe

INGREDIENTS

Chicken-and-pasta-bake-ingredients

  • 1/4 cup butter
  • 1 cup chopped onion
  • 6 cloves of garlic, crushed and minced
  • 1/4 cup all-purpose flour
  • 1 cup milk
  • 2 cans (14.5 oz) diced tomatoes with basil, garlic, and oregano
  • 1 can (15 oz) tomato sauce
  • 3 cups cooked chicken (I get one of the roasted chickens from the store to save time)
  • 4 cups shredded mozzarella cheese (divided into 3 cups and 1 cup)
  • 1 1/2 tsp. salt
  • 1 tsp. ground black pepper
  • 1/2 tsp. sugar
  • 1 (16 0z) pkg. Barilla® Penne Pasta, cooked according to package directions

1) Preheat oven to 350 degrees F.

2) Spray a 13 x 9 inch baking dish with non-stick cooking spray.

3) In a very large skillet, melt butter over medium-high heat.

Chicken-and-pasta-bake-diced-onions-and-garlic

4) Add onion and garlic and cook, stirring occasionally, for about 5 minutes or until onion is slightly translucent.

5) Add flour, and cook, stirring constantly for about 2 minutes.

6) Stir in milk, diced tomatoes, tomato sauce and cook for about 5 minutes or until slightly thickened.

Chicken-and-pasta-bake-tomatoes-and-chicken

7) Stir in chicken, 3 cups cheese, salt, pepper, and sugar.

8) Stir in cooked pasta.

Chicken-and-pasta-bake-penne-pasta

9) Spoon mixture into prepared baking dish and sprinkle with remaining 1 cup cheese.

Chicken-and-pasta-bake-sprinkle-with-cheese

10) Bake at 350 degrees for 25 to 30 minutes until hot and bubbly and the cheese is slightly toasted on top.

Chicken-and-pasta-bake-dish

Serve with warm bread and a nice green salad. 

Chicken-and-pasta-bake-on-table

I'm kind of feeling like this may be a new Mother's Day Tradition. The next time you have all your people with you around the table, don't forget to go simple, but delicious. 

And by all means, be kind to your mother. She lives for this kind of stuff.

This is a sponsored conversation written by me on behalf of Barilla. The opinions and text are all mine.


My Mother's Day of Perfection

I was feeling a little sorry for myself because Mother's Day is coming and half of my kids are scattered all over the map. See this story.

For us Cubans, as is true for most Hispanic cultures, Mother's Day is like a High Holy Day. Am I right?

Either way, I was still going to celebrate with the 2 that are still here and of course, I'll be spending the afternoon with my own mom and wearing the mandatory Red Carnation, of course.

I was still kind of day dreaming about how wonderful it would be if we could have one big dinner together. Wouldn't it be awesome if they could all be here for Mother's Day? 

It was more of a fantasy than an actual prayer, however...

Through some miracle of work scheduling and life events, it turns out that I'm going to have them all with me on Sunday, May 10th for Mother's Day. BEST. GIFT. EVER!

*does the happy dance*

My-big-fat-cuban-family

Because Amy and Adam are traveling here and have other commitments and I want to spend as much time with them as possible, I'm going to be making a very simple dinner. Technically, they have no reason to object since Mami's doing the cooking anyway, but that's not important right now.

You know how much I love to cook for my family. I'm just so crazy happy to have them all here. My goal is to get the most out of the weekend and spend every last possible minute I can with them. 

I'm proud to say that I have parnered with Barilla® Pasta to make a simple and memorable Mother's Day feast. I had to keep from making myself crazy with creating an elaborate menu. And I think we have achieved simplicity here.

I got the following recipe from Barilla® Pasta. It's simple and delicious and I'm oh-so-grateful that this is a wonderful start to a winning menu. I ran over to Walmart and picked up all the ingredients pretty easily. 

I'm making spaghetti, people! *everyone cheers*

I only made one substitution - the crushed tomatoes for the whole ones.

Barilla Pasta San Marzano Spaghetti

Barilla® Spaghetti with San Marzano Tomato Meat Sauce

Preparation Time: 20 minutes - Servings:  8

Ingredients:

  • 1 box Barilla® Spaghetti
  • 4 tablespoons extra virgin olive oil
  • 1 small onion, chopped
  • 1 small carrot, chopped
  • 1 stem celery, chopped
  • 1 pound ground beef
  • 1/2 cup White wine (optional)
  • 1 28-ounce can San Marzano Tomatoes*
  • 2 tablespoons basil* 
  • 1 cup water
  • Salt and black pepper to taste
  • 1/2 cup Parmigiano-Reggiano, shaved

Barilla-pasta-ingredients

 * NOTE - I substituted 28 oz. can of Cento Crushed Tomatoes because that's what my people prefer, and added two tablespoons of basil so I could get the same flavor because the San Marzano Tomatoes have basil already added.

Barilla-pasta-cento-crushed-tomatoes

Directions:

1) PLACE a pot of water to boil.

Barilla-pasta-pots

2) MEANWHILE, in a large skillet, sauté the onion, carrot and celery with the extra virgin olive oil. ADD the meat and cook until browned well.

Barilla-pasta-chopping-onions.jpb


3) INCORPORATE the tomatoes and 1 cup of water, season with salt and pepper to taste and bring to a simmer. 

4) COOK pasta in the boiling water according to the package directions. DRAIN pasta and toss with sauce. TOP with cheese. 

Barilla-pasta-pasta-and-sauce

5) OPTIONAL: After the meat is browned, you can deglaze the sauce by adding the wine and let it reduce all the way. 

My-big-fat-cuban-family-pasta

There you have a simple, crowd-pleasing, absolutely delicious meal that everyone loves. Also, I'm not going to be spending hours in the kitchen, I'm going to be spending lots of time with the ones I love best. 

And isn't that what we all really want for Mother's Day?

This is a sponsored conversation written by me on behalf of Barilla. The opinions and text are all mine.


The Quinceañera Story and A Homemade Mayonnaise Recipe

My mom just recently celebrated her 101st birthday. (It's still weird to say that.)

As people do when they get older, she repeats stories that she particularly likes or maybe it's that the memory gets fresher as time passes. Either way, as her birthday approached, she would tell the story of her 15th birthday. 

In Cuba, as in other spanish-language countries, the 15th birthday is a Big Deal. It's the quinceañera, people! 

For her 15th birthday, which she celebrated in 1929, she received a few gifts from her mother and great aunts. This day might have been lost down the memory hole, but for the other gift that she received that day, which was this photograph.

Luza 2007 1

Her gifts were that beautiful Spanish Comb in her hair and the mantilla she's wearing. She also remembers vividly one of her aunts making her a big jar of delicious homemade mayonnaise. 

This is the memory that stops her in her tracks. She gets this dreamy look on her face as she time travels back to the taste of The Best, Most Delicious Homemade Mayonnaise. It was made with olive oil and eggs and a squeeze of lemon and apparently it was to die for.

I've heard the Quinceañera and Mayonnaise story a million times. And as we were approaching her 101st birthday, I was at a loss for what to get her as a gift. I wanted it to be special. 

Wait. What if I made homemade mayonnaise?

Yes. Perfect.

I wanted to make it simple, but I wanted the flavor to be exquisite. It's a simple process, but it's also a science experiment that can quickly go wrong if the ingredients don't emulsify well. 

My-big-fat-cuban-family-homemade-mayonaisse-final

Luza's Homemade Mayonnaise

INGREDIENTS

  • 1 egg yolk (at room temperature - very important!)
  • 1 tablespoon freshly squeezed lemon juice (I went with a Meyer lemon for color and flavor)
  • 1 tablespoon water
  • 1 tablespoon mustard 
  • 1 cup olive oil (I used garlic infused avocado oil for a lighter flavor)
  • Salt to taste (I like kosher salt)
  • Container for the mayonnaise, preferably with a top, like a mason jar

My-big-fat-cuban-family-homemade-mayonaisse1

Directions

1) Place egg yolk, lemon juice, water, and mustard in jar.

My-big-fat-cuban-family-homemade-mayonaisse3

2) Slowly pour over olive oil and gently whisk together. I used a whisk at the beginning, but traded up to an immersion blender towards the end.

What you're looking for is for the emulsification which is a fancy word for "when it thickens up."

My-big-fat-cuban-family-homemade-mayonaisse4

3) Season with kosher salt to taste. Can be stored in the refrigerator for about 3 to 4 weeks.

NOTE: It came out that dark yellow color because I used a Meyer lemon and organic egg yolks which tend to have more color. The taste was worth it.

Full disclosure: The unthinkable happened. It didn't emulsify on the first round.

I HAD BROKEN THE MAYONNAISE! I collapsed into a defeated mess. After all that careful choosing of the perfect ingredients and careful blending, I had failed. *sigh*

Thank goodness for Google, my self-esteem (and the mayonnaise) were not beyond repair.

Here's a tip: If your mayonnaise doesn't emulsify, get another clean bowl into which you add 2 room temperature egg yolks and a teaspoon of cold water. 

Now, add your broken mayonnaise to that and blend away. At this point I used the immersion blender because I was starting to feel a little superstitious, but that's not important right now.

Emulsifying-mayonnaise

Hallelujah! It worked!

My-big-fat-cuban-family-homemade-mayonaisse-jar

My mom loved it. She was thrilled that I remembered the story. (Which, of course, was easy, because she's told it a bizzillion times, but that's not important right now.)

The party was a great success as we celebrated her 101 years on this earth. She was surrounded by those she loves most and it was a super happy day.

Luza-is-101

Are you looking for a perfect gift for your 101 year old parent? May I suggest a jar of homemade mayonnaise? 

Hipster Baby Shower

Welcome to the 2nd installment of Over-Sharing About My Parties Week

As you already know, I have a beautiful grandson who was born in August. His name is Asher David-Edmund and he is a gorgeous creature that we are all head over heels in love with.

Behold the besotted grandparents:

Asher and me

Eric & asher

Before he arrived, we had a really fun Hipster Baby Shower (of course!) in honor of him and his mama, which I want to overshare with you today. It was Amy who dubbed it The Hipster Baby Shower. I think because we had really different from your usual baby-shower-type decorations and food. Read on.

The Invitations

The theme for the baby's room was foxes and owls, so I created an invitation with a sweet owl design. For the life of me, I couldn't come up with a cute fox that made me happy, but that's not important right now.

I chose the tan, green and brown colors because that seemed woodsy and owlish to me. I used Photoshop (which I always do) because I like that I can add drop shadows to add a bit of dimension and texture.

Baby Shower Invitation

Our original plan was to have the party outside in my happy backyard with all the festive flags and things. However, it happened that that particular Sunday turned out to be The Hottest Stinking Day of 2014 here in Southern California with not a breeze in sight. 

So at the last minute (as in that very morning!) I made the executive decision to bring the party inside. Yikes! Freakishly small cottage-like house, remember?

But gratefully I have a very willing and understanding staff (ie. my family) and they quickly moved furniture and set up tables and things indoors while I was in the kitchen making delicious things.

The Centerpieces & Decor

I have seen baby shower decorations that are a banner-like clothesline full of baby clothes which I love because not only is it adorable, it's quite practical for the new arrival. But I wanted to do something slightly different for this event.

Also, I had a dream before they even knew that the baby was going to be a boy.

*Insert trippy dream sequence music here*  

In my dream, a little guy in denim overalls toddled up to me and I said to him in surprise, "You're a boy!" And he responded with, "You're my Wella!" And then I woke up. And I knew beyond a shadow of a doubt that this baby was going to be a boy. Also, you may now call me, Wella. (FYI: Abuela is the word for grandmother in Spanish. It works.)

I had a brainstorm. 

"What if..." I asked Lucy and Amy, "We got slightly larger, toddler-size clothes and stuffed them? Also, I really, really need to find some denim overalls."

They both agreed that it sounded a little crazy, but they decided to trust me. So off we went to shop for toddler boy things. And can I just say...is there anything cuter? Beside toddler girl things? (Notice the overalls, please.)

Baby overalls centerpiece

Lucy created a Welcome Asher Banner using my Silhouette Cameo.  

Baby shower centerpiece

Owl

We added summer flowers to add a pop of color and, of course, baby's breath. (See what we did there?)

Baby clothes

The Menu and Recipes

  • BBQ Chicken Skewers
  • Mini Grilled Brie Cheese Sandwiches
  • Beef Empanadas
  • Spinach-Strawberry Salad
  • Chicken & Waffles

The menu was fun and varied and everything still tasted good at room temperature, which made me happy. (This is where some of the Hipster vibe comes in.)

I pinned most of the recipes from Pinterest. I'll add the links.

Brunch

BBQ Chicken Skewers

Chicken skewers

Mini Grilled Brie Cheese Sandwiches

Grilled brie cheese sandwiches

Beef Empanadas (I used the same recipe as my Cuban Picadillo Pies® and cut them into 4 inch rounds, folded in half.)

Beef empanadas

Spinach-Strawberry Salad

Spinach salad

Chicken and Waffles. Yes. I said Chicken and Waffles. I know. Shut up.

I placed 2 Eggo Mini Waffles in each disposable cup. Added a chicken nugget to each one and filled a squeeze bottle with syrup so that guests could add their own.

They were the hit of the day.

Chicken and waffles

Because it was The Hottest Stinking Day of 2014, we just served ice-cold lemonade which was totally perfect.

Lemonade

Both our families showered the new parents with love and awesome gifts. And everyone agreed that the afternoon was a great (and delicious) success.

Asher blanket

Big deal

Look at how adorable all my girls are!

Amy lucy alysha marta

The Desserts

A friend of Alysha's made the gorgeous fox & owl cake pops. How cute are they?

Desserts2

Because I had already cooked everything else, I opted to keep the desserts simple. 

Desserts3

We picked up an apple pie from Costco because that just sounded like a fun dessert. Amy ordered some mini bundts from Nothing Bundt Cakes in assorted flavors. (I know. Great name, right?) Also, we offered some tasty Madeleines, because who doesn't love Madeleines? Am I right? 

All this took place in my freakishly small cottage-like yet air-conditioned home. (Win!)

The new parents felt loved and blessed and maybe just a little bit more prepared to welcome sweet Asher into their lives.

Alysha and adam

Also, call me, "Wella." 

Celebrating Gratitude

In my family of origin we have the custom of always sending out invitations to events that people already know about and are coming to anyway. Welcome to our own special brand of crazy.

Thanksgiving is always on the 4th Thursday of November. My sisters and I are pretty much in constant discussion for weeks ahead of the party. Who will bring what? Who is coming? How many? All those details that I'm pretty sure everyone's family discusses before major events.

Now, having all this information, we dial up the planning to include invitations to the people we already know are coming. Like I said, our own special brand of crazy. But it's our crazy and we like it.

I have also been one-upping myself every year when it comes to setting the tables and creating the atmosphere for the last few Thanksgiving celebrations. Here are the links: 

Styling a Quick and Easy DIY Thanksgiving and The Cuban Hipster Thanksgiving.

I went to Pinterest (where I spend way to much time collecting inspiration and if you don't already, you should totally be following me, but that's not important right now) and found an invitation design I liked well enough to copy in my own fashion.

Also, I've been throwing a lot of parties every month for the past few months that I haven't even written about. (Imagine!) I think I'll just have to write about all of that now that I have time to sit down before the Cuban Christmas Crazy begins around here.

I am now officially declaring that this first week of December will be:

Over-Sharing About My Parties Week. (It has to be done.)

Let the Over-sharing begin!

The Invitations

Here's my preliminary sketch:

My-big-fat-cuban-family-sketch

Here's the finished invitation:

My-big-fat-cuban-family-thanksgiving-invitation

I was quite pleased with how they turned out. Also, if you care about these things, the fonts I used were Market Deco and Thirsty Script, thankyouverymuch.

So, I sent out the invitations the first week of November and everyone who was able to attend responded happily. We only had 20 this year because the people who usually travel, didn't this year and the ones who trade off holidays with other families went elsewhere. It felt more intimate than usual.

If you can technically call a sit down dinner for 20 intimate. Hello? It's a Cuban thing.

Paper Chain Garlands

I know. What??

Paper Chain Garlands. I became kind of enamored with paper chain garlands this year. You know, like the kind you used to make in school out of construction paper? Only in 2014, scrapbooking is a thing and there are a bizzillion choices for decorative papers.

For my color scheme, I chose oranges and purples, with touches of green and teal blue.

Paper chains

And in case you've forgotten, here's how to make paper chain garlands:

  1. Cut strips of paper into 8" x 1 1/2" strips.
  2. Create a loop and close it with tape, overlapping just the ends.
  3. Link the next paper strip into the first loop, again closing with tape and overlapping just the ends. 
  4. The finished chain is determined by how much paper and effort you want to put into it.

I recruited the fam and we created and hung yards of chains in less than an hour. As you can see, I hung the Give Thanks banner we made last year. Before we even got to decorating tables the place already had a really festive air. 

Paper chain garlands

The Tables

When I'm entertaining in my freakishly small cottage-like home, we usually have to move furniture to fit the tables into my front room. We're getting so pro at this, I swear. 

We remove two big armchairs, the coffee table, a side table and lamp to make room for the two 8 foot long tables we put together to seat 14. Our regular dinner table seats 6. If we have more guests we "create" a room in the back, but that's another story. Because we only had 20, we were able to host everyone in one room. (Yay!)

My-big-fat-cuban-table-with-paper-chains

I was originally going to use burlap tablecloths that I found online from a place that will remain nameless because when we opened up the package it reeked of petrolium. I decided to address that problem at another time and just pulled out my classic white tablecloths (which I have in multiple sizes, but again, not important right now) and grabbed some beautiful runners from Pier One. 

I used gold chargers for the base, my most favorite white dishes from Pier 1. They're called Antique Scroll and I have been collecting a few every few weeks until I had at least 14 to set the big table with. These are everyone's favorites and because they're white I tend to get lots of great mileage from them.

Antique-scroll-dishes

Once the gold chargers and dishes were in place, it seemed purple cloth napkins were ideal to pull off the look. 

My-big-fat-cuban-family.table

I designed menu cards to be used as napkin holders. Mostly because I did a version of them for an event last month for a completely different group. I'll blog about that one later this week. All that to say that the whole menu-cards-as-napkin-holder-thing made me really happy, so I decided to use it again.

I created them in Photoshop, using the Market Deco font from the invitation and the cute silverware graphic. 

I was not in charge of the menu at all this year so we went with a very traditional all-American menu with a few add ons. 

I printed the menus on cream cardstock and cut them in half horizontally. We folded, taped the back, and slid the napkins and silverware in each one. I liked how striking it all looked. 

Thanksgiving 2014 menu bands

The place cards were simple. Everyone's names in the Thirsty Script Font with the fork-knife-spoon graphic to the side. These were also printed on cream cardstock. (I do all the printing on my home color printer, an Epson Artisan.)

On the smaller table I used some beautiful square white plates (that totally match my other plates except for they are square!) that I found at Home Goods. (Win!)

My-big-fat-cuban-family-table2

For the centerpieces, I grabbed a few bouquets of fall flowers from Costco and hastily (read, "sloppily") trimmed and put them into gold and silver vases and threw some eucalyptus leaves down and called it good. (Don't look too closely at the centers. I have other skills, I swear.)

My-big-fat-cuban-family-thanksgiving-tables

 The overall effect felt elegant and warm. The paper chain garlands added a whimsical touch. Very much the effect I wanted.

The Meal

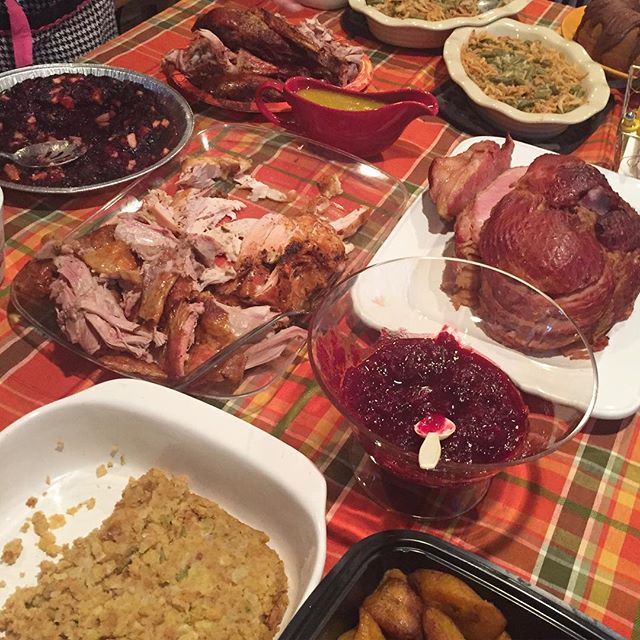
We had two turkeys. One roasted, one barbecued. Both crazy-delicious.

Turkeys

The sides were the usual suspects. I love using the disposable chafing dishes to keep the food hot. Not as pretty as serving dishes, but when you're feeding a hungry crowd they seriously appreciate the meal served hot.

Thanksgiving buffet

Thanksgiving dinner

The Photo Booth

Our dear neighbor (and fabulous photographer), Rafael always generously lends us his photo-booth-making gear and we set that up in Jonathan's room with a white sheet for a background. 

Eric-darby

Then we march each person, family, couple, kids, whoever, in front of the camera and let the magic happen. 

Lucy-and-me

While informal candids will always have their place in our celebrations, I usually have a very low-light situation in the dining area, so the photo booth setup gives us the photos we are wanting with the people we care about. We have so much fun taking turns having our silliness documented forever.

Also, it's becoming more difficult for me to host and document. The photo booth takes care of that for me. Thanks to Lucy for making it happen every year.

Lucy-darby


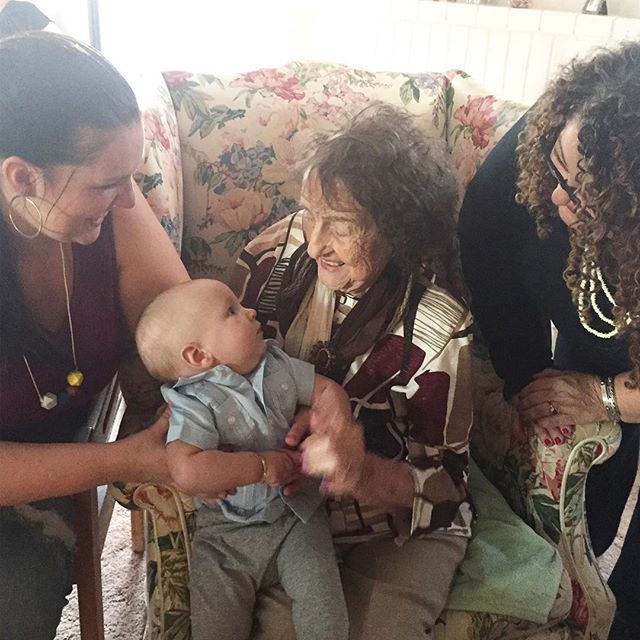
Plus, my mom, Luza (yes, she's 100!) totally gets into this part of the evening because she gets to spend at least a few moments with each and every person present.

Jon-and-lucy-with-luza

Yet another way to track the growth of the kids. All of them.

With-my-grandson

Me and my grandson, Asher. *sigh*

I'm extremely grateful that I have to get to do all of this work to celebrate the gratitude I feel for all the good things in my life. 

What a gift.

Eric-and-me

A Delicious Lesson in Frugal Living

When I was growing up, my mom used to save up all the old crusts of bread from the previous week. I can still remember the place in the cupboard for the old bread. 

On Fridays (which was also Cuban Cleaning Day, which is definitely a story for another day), she would always bake a delicious dessert. We kids never made the connection, being distracted with the business of school and play, that the delicious dessert was a result of the bread leftovers.

Furthermore, it was a money-saving measure. Feeding a family a family of 8 must have been tough.

There are many things I took for granted in my childhood that now make so much more sense. For example, my mom did the grocery shopping on Saturday mornings. So Friday night dinner was inevitably, fried eggs over white rice. (If you're Cuban, you understand the awesomeness of this.) It was because we had basically run out of food. Who knew?

Last week in a fit of enthusiasm, I picked up, not one, but two loaves of wonderfully fresh sourdough bread from a local bakery. Seriously, is there anything better than fresh, hot sourdough with real butter? See what I mean? (Thank you for "getting" me.)

Of course, if you've ever had fresh sourdough bread, you also know that it doesn't keep for very long. We managed to get through the first loaf over dinner on Day One. 

But then, we were out on the 2nd day and before we knew it, it was Day Three and that sourdough loaf was, well, not exactly fresh anymore. (I would say any fresh bread shouldn't last too many days anyway, but that's not important right now.)

As I was cleaning out the bread box, I stared at that beautiful, and untouched (if slightly old) loaf of sourdough and just couldn't toss it. I suppose I could have made croutons, but I swear, it was just too beautiful. 

So I quickly consulted my Recipe Development Dream Team, which consists of Martha, Ina, Ree, and Rachael and together they helped me come up with the following recipe. Ree wanted me to add whiskey, and Rachael insisted cayenne pepper would add just the right kick. I ignored them both with pleasingly decadent results.

I decided that Frugality is the new Decadence. (Gracias, Mami!)

Sourdough-bread-pudding-with-pecans

Sourdough Bread Pudding with Salted Honey Sauce

INGREDIENTS

  • 2 eggs
  • 2 cups milk, at room temperature
  • 2 Tablespoons butter, melted
  • 2 Tablespoons pure vanilla extract
  • 1 1/2 cups sugar
  • 4 cups sourdough bread, cubed
  • 1/3 cup chopped pecans

Sourdough-bread-pudding-ingredients

DIRECTIONS

1) Preheat oven to 325 degrees F.

2) Using an electric mixer, beat the eggs, then add the milk, melted butter and vanilla.

3) Gradually add the sugar and mix until dissolved.

Sourdough-bread-pudding-mix

4) Place the bread cubes in a 9 inch round baking dish and pour the egg mixture on top.

Sourdough-bread-pudding-pecans

5) Sprinkle the pecans on top and slightly press them into the bread. Bake until set, about 50 minutes. (Check and give it a little more time if you need to. The pudding will set a bit more once you take it out and let it rest.)

Sourdough-bread-pudding-sauce

Salted Honey Sauce

  • 1 stick (4 ounces) melted butter
  • 3/4 cup honey (I went with the thicker spun honey for more flavor)
  • 1/4 teaspoon ground cinnamon
  • Dash of sea salt
  • 1/2 cup heavy cream

1) A few minutes before the pudding is done, in a medium saucepan, heat the stick of melted butter with the honey, cinnamon, and salt over medium heat, whisking to combine.

2) Whisk in the cream. Drizzle half of the warm honey sauce over the bread pudding and serve the rest alongside. 

Sourdough-bread-pudding

Pat yourself on the back for being so delicously retro and money-wise.

The Random Italian Thing or Mac and Cheese for All

We're getting ready to celebrate my mom, Luza's 100th birthday in another week. And of course, as we're trying to put this thing together, we've tried to include her in as many decisions as possible.

Luza invitations

She doesn't care much about the decorations, she says. She trusts us with those, as long as they are bright, not just one color, but all the spring colors, but no red and absolutely no black. Oh, and flowers. Lots of flowers. (So much for the trusting us part... but that's not important right now.)

There are two other things that she has a very strong opinion about.

1) Send an invitation to every single person in her address book. This was a no-brainer and obvious to us, of course. The interesting part is that the names in her address book ranged from her first neighbor in Miami back when we first arrived in the U.S. back in 1961 to her old ESL classmates from the 70's. *shaking my head*

2) When we asked if she had a preference for the food we'd be serving, she said, "Yes, I want it to be Italian."

This second feature comes up randomly and at the most bizarre moments. Of course, there's a back story...

The Random Italian Thing

When she was growing up in the Cuban port town of Manatí (read some of that story here), the big cargo ships would come in to load Cuban's main export, which was sugar and they would unload whatever import happened to be coming from Italy (of all places). It was the Italians that captured her imagination. They were from a far away place called, Napoli, and they sang songs, like "Oh, Marie," and talked in accents and fascinated the residents of Manatí, particularly the children.

Apparently the entire family was enthralled with the Italian Thing. My grandmother, Osmunda (as my mom tells the story) learned to cook the most amazing macaroni. And every now and then, as happens to all of us, the craving for the food that her mom cooked overwhelms her.

So, the menu for the party is Italian with a Cuban spin.

In honor of that, I'd love to share this recipe for the most delicious Mac and Cheese. It's pretty simple and in fact, I did a test run the day of the Super Bowl Big Game and it was a hit with everyone. My grandmother, Osmunda's secret was to use chicken broth to cook the pasta and then make it in a flat pan so that every bite has cheese and crunch. I promise you will love.

In honor of Luza's 100th Birthday and the Random Italian Thing, I give you...

  The best mac and cheese

Flat Pan Mac and Cheese (estilo Osmunda)

  • 3/4 pound elbow macaroni
  • 8 tablespoons unsalted butter (you'll be dividing it up)
  • 1/4 cup flour
  • 2 cups whole milk (must be whole for the best texture)
  • 5 cups chicken broth (divided)
  • 1 1/4 teaspoons kosher salt
  • Freshly ground black pepper to taste
  • 6 oz bread crumbs. (I use fresh bread and make crumbs with my food processor. This gives it a fresher
  • taste.)
  • 1 medium bunch of fresh parsley
  • 5 cloves of garlic, peeled
  • 1/4 teaspoon kosher salt
  • 1 1/2 cups of grated Parmesan cheese (about 4 ounces)
  • 1 cup Fresh Mozzarella, diced into small cubes (8 oz)
  1. Preheat oven to 425°F.
  2. Bring 3 cups of water to a boil. Add a tablespoon of kosher salt.
  3. Boil macaroni for about 5 minutes. You want it "al dente." Drain. Do not rinse. Set aside.
  4. In the same large pot, melt 4 tablespoons of butter over medium-high heat.
  5. Add flour, whisking constantly for about a minute. Add milk and chicken broth, whisking constantly.
  6. Bring to boil, then reduce heat and gently simmer. Add kosher salt and pepper to taste.
  7. Simmer until mixture begins to thicken, about 20 minutes. Note: It won't get too thick, but it should coat the spoon.
  8. Meanwhile, melt remaining 4 tablespoons of butter. Measure 3 cups of breadcrumbs (Pulse bread in food processor to make crumbs or use packaged crumbs) and place in a mixing bowl.
  9. Add parsley and garlic to food processor. Pulse until fine, then add to bowl with breadcrumbs. Season with 1/4 teaspoon kosher salt. Pour butter over top and mix with spatula until combined.
  10. In a large mixing bowl, toss macaroni with grated the grated Parmesan — it's ok if the noodles are sticking together.
  11. Pour the milk mixture (bechamel) over the top of the noodles. They should come apart easily now.
  12. Line a long, flat, jelly roll pan with a sheet of parchment paper. Spread macaroni mixture over top.
  13. Distribute the diced mozzarella cubes over top. Scatter breadcrumb mixture evenly over top of those. You can add any other toppings that make you happy at this point. I like it as is.
  14. Bake for 25 to 30 minutes, or until top is golden and the macaroni is bubbling. Let it sit for about 10 minutes before serving.

 Also, it's not too late if you would like to send my mom a Happy 100th Birthday Greeting. Click here and feel free to leave your good wishes in the comment section.

Taking the Cake

It's not often that the entire family has the same craving at the very same time, but occasionally it happens.

The dinner conversation started innocently enough. "Best dessert you've ever had. Go!"

"Mom's Chocolate Mousse."

"The triple layer chocolate cake from the Daily Grill."

"Lemon bars."

"Pastelitos de guayaba. Duh."

"No. Wait! Remember the warm butter cake from California Pizza Kitchen?"

That's where the conversation abruptly ended. We all agreed that yes, the Butter Cake we had had at CPK was the best thing any of us had ever tasted. I actually had a childhood cake experience that came quite close, but that's not important right now.

The conversation eventually turned to: "Mom, you should make it."

And so it was that I went on a hunt for the Best Butter Cake Recipe. It turns out that CPK is not forthcoming with their recipe and that lots of people try to replicate it with varying degrees of success. And truly, there are a lot of good butter cake recipes out there. I finally found one that made me happy in my mom's old Cocina Al Minuto Cookbook. (Go figure.) 

It's called "Cake Coriente." Or, Basic Cake. (Umm...no. It's kind of fantastic. Nothing basic about it.)

So I tweaked Nitza's recipe a bit and played with the cream cheese topping. The key to the cream cheese filling is that it needs to give it the sufficient gooeyness this particular butter cake requires.

I was going to make the cake in individual ramekins, but I stumbled upon these cool mini (5 inch) springform pans at Target (here's the link) from Wilton that made me very happy. And since I was adding the cream cheese, I thought the cakes might go all cheesecake on me, so I decided these were a good choice.

Mini springform pans

Warm Cuban Butter Cake Recipe

Cake Batter
 (makes 4 - 5 inch cakes)

Start with all the ingredients at room temperature (including the eggs). If any of them are too cold, the batter and the cream cheese layer won't set up correctly.

  • 2 cups (4 sticks) unsalted butter
  • 4 ounces cream cheese
  • 2 1/4 cups granulated sugar

  • 2 large eggs
  • 1/2 teaspoon sea salt

  • 1 1/2 cups all-purpose flour

  • 1 1/2 teaspoons vanilla extract

Cream Cheese Layer

  • 4 ounces cream cheese
  • 1 egg
  • 1/3 cup granulated sugar

  • 1/2 teaspoon vanilla extract

Pre-heat oven to 325 degrees F.

1) Spray 4 mini springform pans (or ramekins) with baking spray or butter.

Prepare the cake batter as follows:

2) In a stand mixer cream butter, cream cheese, and sugar for 1-2 minutes.

3) Add eggs one at a time and beat on low for 20 seconds after each addition.

4) Whisk flour and salt, then add to creamed mixture. Beat on low until just incorporated, making sure not to over beat.

5) Add the vanilla.

Prepare the cream cheese layer as follows:

1) In a small bowl whip together cream cheese and granulated sugar until creamed, add egg and vanilla extract.

2) Pour cake batter into prepared springform pans then top with a layer of the cream cheese mixture. Bake for 60 – 75 minutes at 325 degrees (F), or until tops are golden brown and a toothpick comes out clean when inserted into the center of the cakes.

Butter cake
Butter cake

You can go ahead and make the cakes a day ahead and refrigerate. When ready to serve, microwave until hot (approximately 40 seconds). With a kitchen torch, you can brûlée the top and sides of the cake to caramelize the sugar crystals, but this is not necessary. The cakes will come out beautifully. I promise.

Optionally, you may want to drizzle with guava marmalade, which takes this dessert to another level, but that's not important right now.

I think the very best part of this entire process for me was licking the beaters.

Cake mixer
Cake mixer

I swear, I haven't done this for years. I may or may not have traveled back in time a bit.

Also, I promise you, there's nothing "corriente" about this cake.

// <![CDATA[ // &lt;![CDATA[ // &amp;lt;![CDATA[ var pfHeaderImgUrl = &amp;#39;&amp;#39;;var pfHeaderTagline = &amp;#39;&amp;#39;;var pfdisableClickToDel = 0;var pfHideImages = 0;var pfImageDisplayStyle = &amp;#39;right&amp;#39;;var pfDisablePDF = 0;var pfDisableEmail = 0;var pfDisablePrint = 0;var pfCustomCSS = &amp;#39;&amp;#39;;var pfBtVersion=&amp;#39;1&amp;#39;;(function(){var js, pf;pf = document.createElement(&amp;#39;script&amp;#39;);pf.type = &amp;#39;text/javascript&amp;#39;;if(&amp;#39;https:&amp;#39; == document.location.protocol){js=&amp;#39;https://pf-cdn.printfriendly.com/ssl/main.js&amp;#39;}else{js=&amp;#39;http://cdn.printfriendly.com/printfriendly.js&amp;#39;}pf.src=js;document.getElementsByTagName(&amp;#39;head&amp;#39;)[0].appendChild(pf)})(); // ]]&amp;gt; // ]]&gt; // ]]>

The Best Baked Potato Soup EVER®

For the holidays many of us get one of those beautiful spiral hams. You set it out on your table and it always gets oohs and aahs. There's nothing like a fabulous ham. Am I right?

For Thanksgiving we served two turkeys - one smoked, one roasted, and then there was also the spiral cut ham. Because we Cubans like an abundant table.

There are a dozen things to do and make with the leftover turkey. But what, you're probably wondering, do you do with the left over ham bone? You make the Best Baked Potato Soup EVER®. Of course.

Okay, I know you can also make a really great split pea soup, but that's not my favorite. I'll write about that another day. Right now, let's make...

The Best Baked Potato Soup EVER®

Baked potato soup

Ingredients

  • 1 ham bone with lots of visible meat
  • 1 yellow onion, diced
  • 4 cups water
  • 1 stalk celery, diced
  • 1/2 teaspoon salt
  • 1/2 teaspoon ground black pepper
  • 1/2 teaspoon white pepper
  • 5 or 6 medium-sized red or Yukon gold potatoes, cut into 1-inch cubes - You can also use Russets for a heartier flavor, but they take a little longer to cook and make the soup starchier.
  • 1/2 cup butter
  • 1/2 cup flour
  • 2 cups half-and-half
  • 1/2 cup grated cheddar cheese
  • 4 pieces of bacon - cooked and crumbled
  • green onions - sliced
  • Sour cream to taste

Potato soup hambone potatoes

Directions

1) Place ham bone, diced onion, water, diced celery, salt, black pepper, and white pepper in a big pot on the stove over medium heat and bring to a boil.

Potato soup ingredients in pot

2) Cover and simmer for about 30 minutes or until the ham separates easily from the bone with a fork.

3) Remove ham from pot and shred some of the meat from the bone. Discard any fat, then return to pot.

4) Add diced potatoes. Bring to a boil. Reduce heat and simmer until the potatoes are fork tender.

Potato soup ham in pot

5) While potatoes are cooking, melt butter in a medium saucepan, over medium heat. Be careful not to brown or burn the butter.

Potato soup melt butter

6) Add flour, stirring constantly until mixture thickens into a loose dough.

Potato soup butter and flour

7) Stir in half-and-half, stirring constantly over medium heat until it's all creamy and thick and bubbly. Careful not to scorch! When it's nice and thick (you can tell by what's on the spoon), remove from heat.

Potato soup stir in half and half

8) At this point you can remove the bone and discard. When the potatoes are tender, stir the sauce mixture into the potato pot, stirring constantly. Let simmer until the soup reaches the desired consistency. The potatoes will break down a little and add to the thickness. It's kind of beautiful. You can add milk if you want it less thick.

Potato soup sauce into pot

9) You may want to add more salt and pepper to taste at this point.

Pot of potato soup

10) Top your soup with bacon, cheddar cheese, green onions, and even a little bit of sour cream.

Hearty potato soup

Congratulations! You just made The Best Baked Potato Soup EVER®!

Buen Provecho!

Sharing is caring! If you decide to make this soup, please be sure and share with me. You're welcome to post on the My Big, Fat, Cuban Family Facebook page.

Print Friendly and PDF